Add some sparkle to your table or desk. I’ll show you just how easy it is to make your own glitter painted mason jars.
After you master the technique, you can change the colors and make them for every season and occasion.

How To Paint Glitter Jars Without Making A Mess
I love-hate glitter. It adds so much sparkle and beauty to crafts and I want to use it on everything! But the problem is, it really does get on EVERYTHING.
That didn’t stop me from enjoying it though. (I even used it to make glitter soap!).
For this craft, I didn’t use loose glitter. To keep things saner and less messy, I used glitter paint instead. The glitter is in the paint so it doesn’t get on everything! I might use glitter paint on all my crafts!

How To Make Painted Mason Jars
Here’s the tutorial complete with all the steps you need! This is a really fun craft to do with your kids, your partner, or a bunch of friends.
I have a printable craft card at the very bottom of the post is you want to see all the steps together. First, I’ll share some photos for all of you visual-learners (like me!).

Supplies Needed
- 3 glass jars in varying sizes, lids removed
- Decoart Multi-Surface in Soft Jade, Coastal Waters, Iris
- Medium Flat-Tip Paintbrush
- Decoart Galaxy Glitter in Clear Ice Comet
- Painter’s Tape, 1” wide
Step-by-Step Photos
Here are the pictures of each step in the craft. Now you can see exactly why I love making this so much!

Before you even begin to paint or add the painter’s tape, you need to wash the jars completely. That means thoroughly removing any residue from old labels (if you are reusing a jar).
How Do You Get Label Residue Off A Mason Jar?
I got this hack from watching the TV show Bones. After trying it I was shocked that it really does work! Use peanut butter. I’m not kidding, slather the old label area with peanut butter.
After you let it set for a few hours, use a scraper or butter knife and run it under warm water. The gunk will come off with the peanut butter!

Now you can begin painting your mason jars! If you have lots of space to cover, use a larger paintbrush. It will save you lots of time and keep the paint strokes smooth.

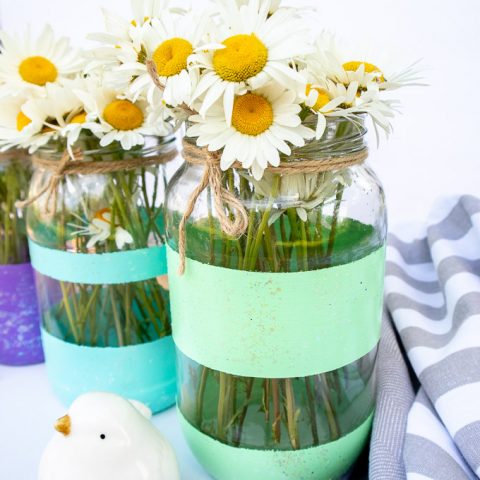
This is what it will look like after you finish painting the base coats. You can stop here if you want and just enjoy the lovely satin shades. I wanted glitter!

This the best step! After you let that base color coat dry, paint on the galaxy glitter paint! I didn’t use a really large amount, but you can use as much as your heart desires.

Let that glitter paint dry completely. When it is fully dry, begin to peel that painter’s tape off and enjoy your new vase! I added some twine to the lip and put some daisies in. It’s so pretty!
DIY Painted Mason Jars Tutorial
Here’s the printable craft card with all the tutorial steps in one place. Pin this on your craft board and share this post with your friends! Thank you!
DIY Glitter Painted Mason Jars
Follow these steps to paint your very own sparkly mason jars!
Materials
- 3 glass jars in varying sizes, lids removed
- Decoart Multi Surface in Soft Jade, Coastal Waters, Iris
- Decoart Galaxy Glitter in Clear Ice Comet
Tools
- Medium Flat Tip Paint brush
- Painter’s Tape, 1” wide
Instructions
- Thoroughly wash jars with soap and water. Dry completely before painting.
- For each jar, position a piece of painter’s tape around the circumference in varying distances. For the smaller jar, apply only one piece of tape at about the middle height.
- Paint the lower half of the smallest jar in Iris.
- Paint the spaces between the painter’s tape on one of the medium-sized jars in Coastal Waters.
- Paint the spaces between the painter’s tape on the other medium-sized jar in Soft Jade.
- Repeat with an additional coat of paint for more coverage. Repeat as needed. Ensure paint is fully dry before applying additional coats.
- Cover the painted portions of the jars in Galaxy Glitter paint. Repeat as needed until desired coverage is achieved. In this case, we applied 3 coats of glitter paint.
- Peel off the painter’s tape when dry.

More DIY Crafts
Here are some more things you can do for fun. All of these ideas can be turned into DIY gifts too.
Leave a Reply